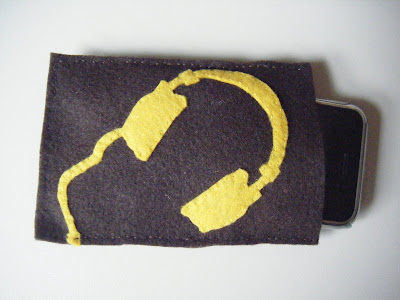
My little brother (who is not so little anymore!) recently had a birthday. I wanted to make part of his gift, but it is hard to think of sewing projects for young hip men.
A few months ago Meghan and I volunteered at a fundraiser for an elementary school. The idea was that you brought old clothes and sewing notions with you, and then you could look through piles of other people's donated clothes and find items to refashion. Then there were sewing stations and helpers (this is what I did) to help you refashion your items right there. They also had dyeing and screen printing stations. Then there were some project tables geared more towards children to help them make a simple craft or project. One of the stations was to make iPod covers out of felt. I was impressed by how simple they were, yet they turned out looking adorable! So when I was trying to come up with a birthday gift for my brother I thought of these cases. He just recently got a new iPhone, so I thought this was the perfect gift. The ones that I saw at the fundraiser were more feminine, but I figured that I could make them masculine. My first step was to consider his interests. He is currently studying architecture at a school in Chicago, and he is the co-host of a radio show on their school's radio station. So I came up with two different cases for him. I tried to keep both the subject matter and the colors masculine.
A few months ago Meghan and I volunteered at a fundraiser for an elementary school. The idea was that you brought old clothes and sewing notions with you, and then you could look through piles of other people's donated clothes and find items to refashion. Then there were sewing stations and helpers (this is what I did) to help you refashion your items right there. They also had dyeing and screen printing stations. Then there were some project tables geared more towards children to help them make a simple craft or project. One of the stations was to make iPod covers out of felt. I was impressed by how simple they were, yet they turned out looking adorable! So when I was trying to come up with a birthday gift for my brother I thought of these cases. He just recently got a new iPhone, so I thought this was the perfect gift. The ones that I saw at the fundraiser were more feminine, but I figured that I could make them masculine. My first step was to consider his interests. He is currently studying architecture at a school in Chicago, and he is the co-host of a radio show on their school's radio station. So I came up with two different cases for him. I tried to keep both the subject matter and the colors masculine.
If you would like to make your own iPod, iPhone, camera, phone, etc... cover it is very simple! I thought about making a tutorial, but this project was pretty easy, so I thought that a step by step list would be specific enough.
1. Draw a sketch of what you want to be on each side of the case. You can make them each different, or make them both the same!
I wanted to make the Chicago skyline on one side, and a closeup of the Willis (aka Sears) Tower on the other side.
For my other case I planned headphones on one side, and a turntable on the other.
2. Measure the phone or iPod that you are making the case for. Remember to measure the width. For each side I took the side's measurement (example: from the top to the bottom) and then added 1/2 inch for a seam allowance, and the of the width of the phone. That number is the measurement I cut for the length of the cover.
3. Measure and draw two rectangles with these dimensions onto a piece of paper and cut out your rectangle. This will be the front and back sides of your case.
4. Draw your design on each paper rectangle. You can either draw it freehand or print a photo or graphic from your computer and trace it onto the paper. Remember the more basic the shape you choose the easier it will be to cut and sew!
5. Choose what colors you want to use for your case. This is the fun part! Pin the paper to the felt color that you want to use for your background and cut out the two felt rectangles.
6. Cut out your paper designs and pin them to the felt color that you have chosen for the designs. Cut very carefully around the paper.
7. Center the design however you choose to the front and back pieces of your cover and sew them in place. You can sew by hand or on your machine. If your design has a lot of curves or corners it might be easier to sew by hand. It will probably be a lot faster to sew with your machine, but I think that it adds a certain character to the finished product if it is sewn by hand.
8. Line up your front and back sides with the designs facing out (wrong sides together) and sew around three sides leaving one of the short sides open to slide the iPod in and out. I originally planned to sew down my designs by hand, but then use my machine for the seams around the edges, but the hand sewing looked so cute that I decided to do the whole thing that way!
That is it. Done!!
- Laura
- Laura


You are an awesome sister, those presents rock!
ReplyDelete